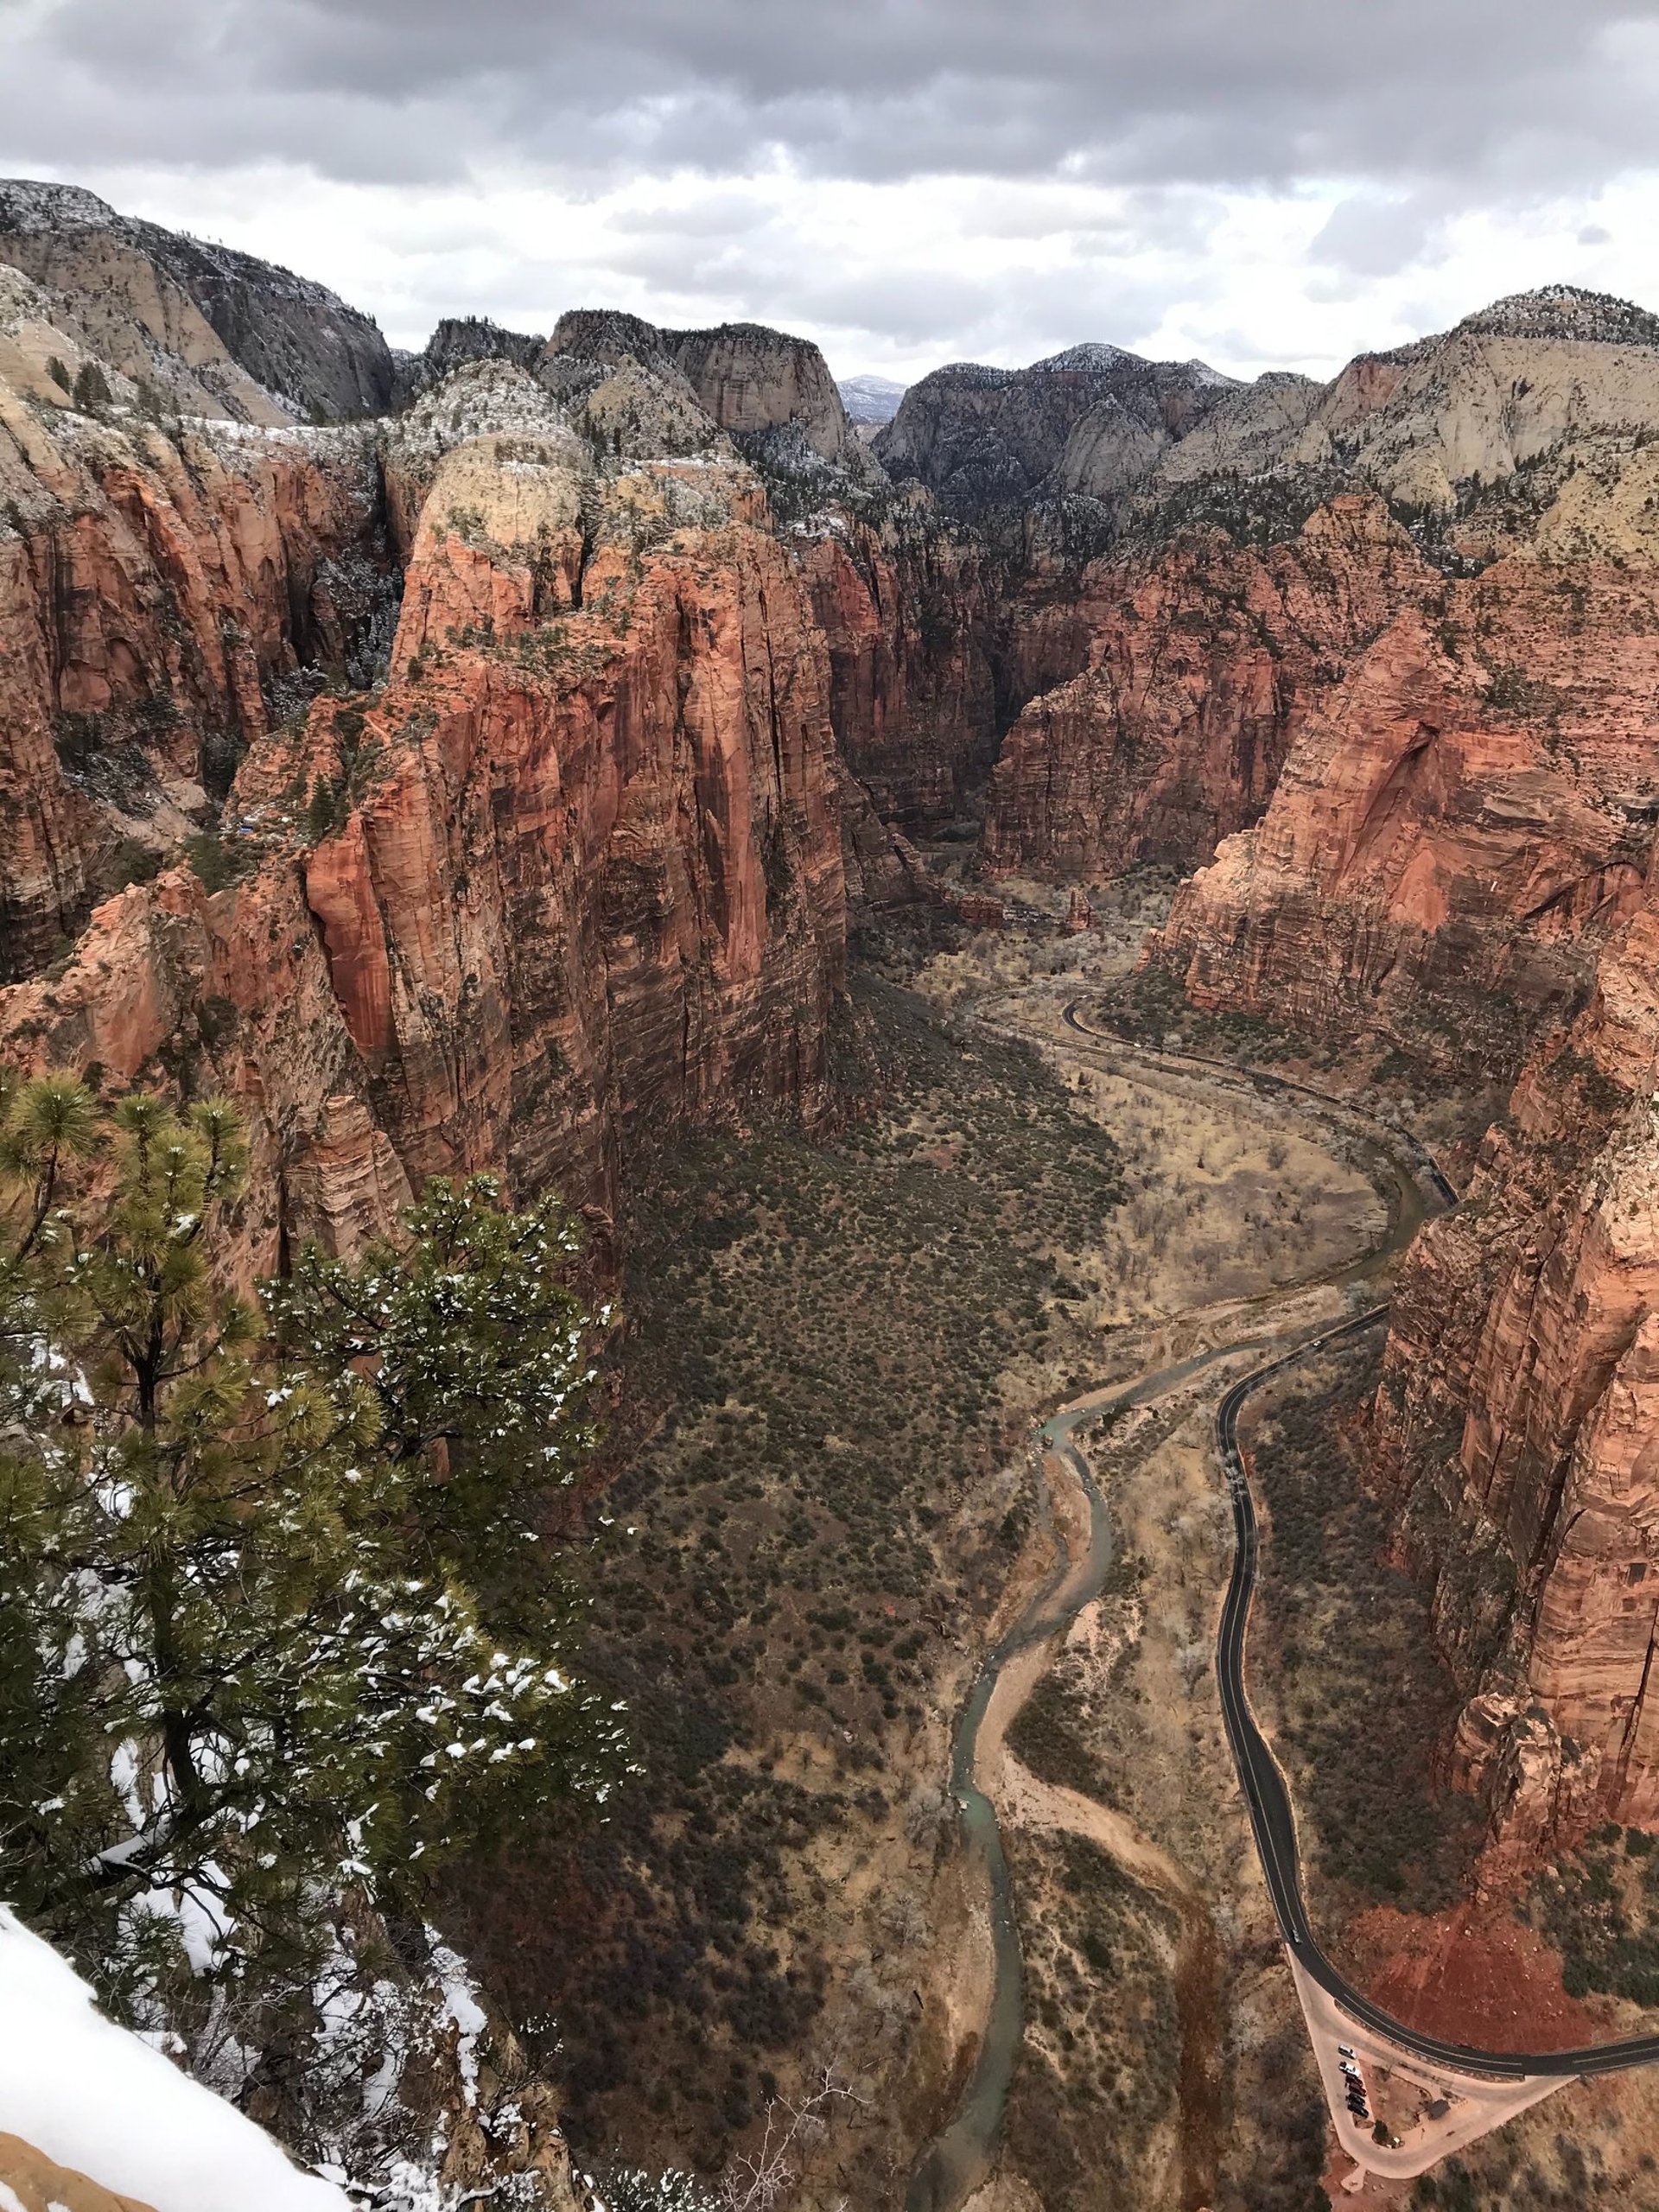
Where To Best See good examples of Geology in St. George:

  1. Zion National Park:

    1. Zion Canyon Scenic Drive: Look for the prominent rock layers exposed in the canyon walls, particularly around the Court of the Patriarchs. You can observe the tilted and folded sedimentary layers that indicate past tectonic activity, as well as the transition between different rock types.

      • Observation Point: From this viewpoint, you can see the results of erosion along fault lines. The dramatic cliffs show layers of Navajo Sandstone that have been shaped by geological forces. The contrast between the cliffs and the valley provides excellent context for understanding fault processes.

  2. Snow Canyon State Park:

    • Johnson Canyon Trail: As you hike, keep an eye out for the fractures and joints in the rock formations, as well as evident layers of lava rock that have flowed from volcanic activity. You may spot areas where the geological strata appear displaced, indicating past fault movements.

    • West Canyon Road: Along the drive, you can observe the smooth and jagged edges of the cliffs, showcasing different layers of rock stacked upon one another. The varied colors and textures also show how the area has changed over time due to geological forces.

  3. Red Cliffs Desert Reserve:

    • East Gateway Trailhead: The trails here provide views of striking red and white sandstone formations. Look for evidence of rift structures and normal faults that have shaped the terrain over millions of years.

    • Red Cliffs Campground: Walk around the campground to see exposed rock formations showing clear fault lines or fractures. There can be layers of sedimentary rock that have been pushed or pulled apart due to tectonic forces.

  4. Hurricane Fault Zone:

    • State Route 9 (Hurricane Area): Along this route, pay attention to the marked pull-off areas that discuss geological features. Look for bends in the road and stabilize areas that might showcase offsets in rock layers along the fault line. In some areas, you may see clear evidence of lateral fault movements.

  5. Dinosaur Trackways:

    • The Footprints Site: Look for the preserved tracks of dinosaurs embedded in the limestone, which often occurs in sedimentary rock layers impacted by geological shifts. While viewing the tracks, consider the geological context of how movements in the earth shaped the landscape.

  6. Local Geology Tours:

    • Consider specific tours that focus on geology, where guides often highlight visible fault lines, rock formations, and fracture patterns in the landscape. They can lead you to some lesser-known spots where you can see fault lines more clearly.

Triple Junction Explination

Colorado Plateau Orgins

St. George Geology Rundown

Southwest Geology

Colorado Plateau Pt. 2

Geologic Spots Explained in Depth

Quail Creek Reservoir Geology Overview

Quail Creek Reservoir, located in southern Utah near St. George, is surrounded by unique and striking geological features characteristic of the Colorado Plateau and the Basin and Range Province. The reservoir itself is a man-made lake created by the damming of Quail Creek, primarily for water storage and recreational purposes. The surrounding area showcases diverse geological formations, including colorful sandstone cliffs, volcanic rock, and ancient river channels, shaped by millions of years of geological processes.

How It Formed

  1. Sedimentary Rocks: The predominant geological formations around Quail Creek Reservoir are sedimentary rocks, primarily sandstone, and limestone. These rocks were formed from sediments deposited in ancient rivers, lakes, and deserts during the Mesozoic and Cenozoic eras. Over time, layers of sediment compacted and cemented to form rock.

  2. Volcanic Activity: The region is also influenced by significant volcanic activity that occurred millions of years ago. Volcanic rock formations, such as basalt, can be found around the reservoir, resulting from lava flows and eruptions in the area.

  3. Erosion and Weathering: The current landscape has been shaped by erosion and weathering, which sculpted the existing rock formations over time. The interplay of water, wind, and ice has exposed different layers of rock, creating dramatic cliffs, canyons, and valleys around the reservoir.

Interesting Facts

  1. Colorful Rock Layers: The geology around Quail Creek Reservoir features vibrant colors ranging from deep red and orange sandstone to lighter beige and white limestone. These colors result from the mineral composition of the rocks and can change dramatically depending on the time of day and the angle of sunlight, creating stunning photographic opportunities.

  2. Habitat Diversity: The geological features surrounding the reservoir create diverse habitats for various plant and animal species. The area supports desert flora and fauna, as well as aquatic ecosystems within the reservoir itself, making it an excellent location for birdwatching and wildlife observation.

  3. Paleontological Significance: Like other areas in southern Utah, the region around Quail Creek Reservoir holds potential for paleontological discoveries. Fossils of ancient marine life and dinosaurs have been found in the sedimentary layers, providing insight into the prehistoric environment and the types of life that existed millions of years ago.

Quail Creek Reservoir not only serves recreational needs but also offers a window into the complex geological history of the region, making it a fascinating destination for geology enthusiasts and nature lovers alike.

Quail Creek Reservoir

Glitter Mountain Geology Overview

Glitter Mountain is a striking geological feature located near St. George, Utah, notable for its sparkling mineral deposits that reflect sunlight, giving the mountain its name. The area is primarily composed of volcanic rock and is a part of the surrounding geological formations that make up the region’s varied landscape. You can dig for your own rocks here!

The owners prefer that people do not go down into the pit, but as long as you use common sense and stay safe, it is okay. Of course, make sure you stay away from any machinery when they are mining.

When we visited, we did not go down into the pit and instead walked around the outside. There was so much selenite on the ground outside of the pit that we didn’t feel the need to go down into it.

We started seeing pieces as soon as we got out of the car!

Bring plenty of water, especially if visiting during the hotter months. There’s no shade.

First of all, there IS an active mining claim on Glitter Mountain, so make sure you read and follow the posted signs when you arrive.

The Feller Stone family holds the claim and has the exclusive right to remove the selenite for commercial sales. They ask first and foremost that you use common sense when visiting the site and use caution around the pit area.

There’s no fee to visit the site, but the owners ask that people pay for any selenite that they take home. There’s a sign on site with pricing information for paying through PayPal or Venmo. We had service out there, so it was really easy to send the money on-site.

It is okay to bring a small hammer, chisel, (or garden tools), and a bucket. They do not allow “mining”, power tools, or heavy digging.

If you plan to use a hammer or chisel or do some light digging, I highly recommend a pair of safety glasses. They’re cheap and a good idea to have on hand if you’re digging around. You can find them easily at hardware stores or on Amazon.

How They Formed

  1. Volcanic Activity: Glitter Mountain is primarily composed of volcanic materials, including basalt and other igneous rocks. These volcanic rocks were formed from lava that erupted from ancient volcanoes in the region. Through various volcanic activities, including explosive eruptions and lava flows, these materials accumulated and solidified over millions of years.

  2. Mineral Deposits: The sparkling appearance of Glitter Mountain is due to the presence of various minerals, particularly certain types of quartz and other reflective minerals that form in volcanic environments. As magma cooled and crystallized, these minerals were formed, contributing to the unique sheen of the mountain's surface.

  3. Erosion and Weathering: Over time, erosion and weathering processes have exposed the surface of Glitter Mountain, revealing the shiny mineral deposits. Wind, rain, and temperature fluctuations gradually wear down the rock, leading to the distinct geological features seen today.

Interesting Facts

  1. Unique Sparkling Appearance: Glitter Mountain gets its name from the significant presence of glittering minerals like mica and quartz. From a distance, the mountain appears to shimmer, especially in sunlight, making it a visually stunning landmark that attracts photographers and nature lovers.

  2. Mining History: The area around Glitter Mountain has a history of mining activity, particularly for minerals. The presence of valuable minerals, such as gypsum and other deposits, has drawn attention for potential extraction, influencing the local economy and geology studies.

  3. Cultural Significance: Glitter Mountain holds cultural significance for local Native American tribes and the surrounding communities. It is often considered a landmark and a point of interest in local folklore and history, adding to its value beyond geology.

Nearby Glitter Mountain is the Little Black Mountain Petroglyph Site.

This is a great stop if you have time for a little detour. There’s a nice walking path to various petroglyphs on the rocks representing 6,000 years of human habitation and use in the area.

Glitter Mountain

🧭 Organized by Location: South to East

🚶‍♀️ 1. Bridge Mountain Viewpoint (Entrance to Canyon near Watchman)

Location: Just inside the South Entrance, visible from Pa’rus Trail or Canyon Junction
Formations Visible:

  • Kayenta Formation (reddish slopes)

  • Navajo Sandstone (white cliff tops)

  • Spring lines and talus slopes

What to Look For:

  • The base of the cliffs is Kayenta, which is less resistant and erodes into slopes.

  • Water seeps out just above the Kayenta-Navajo contact, feeding vegetation.

  • Talus (broken rock debris) piles at the base show ongoing weathering.

Geologic Lesson:
This is a textbook example of a perched spring system caused by differences in permeability—Navajo is porous, Kayenta is not.

💦 2. Weeping Rock Trail (Short hike)

Formations:

  • Navajo Sandstone (main cliff face)

  • Contact with Kayenta about 200 feet down

What to Look For:

  • Water drips right out of the rock face—this is not surface water, but precipitation from up to 1,000 years ago, percolating through sandstone and exiting at the impermeable layer.

  • Observe the alcove shape—caused by erosion at the spring contact zone.

Geologic Feature:

  • Hanging garden and seep spring, along a primary lithologic contact.

  • Look for black streaks—these are desert varnish, made of manganese and iron oxides, slowly forming from water seeping out.

🪨 3. Big Bend / Angels Landing (From the river)

Location: Shuttle Stop 9 (Big Bend)
Formations:

  • Navajo Sandstone, ~2,000 feet thick

  • Cross-sections of massive cross-bedding visible

What to Look For:

  • Up close, you can see angled lines in the cliffs—these are fossilized sand dunes.

  • Notice how bedding planes shift direction—these are slipfaces from migrating dunes.

Geologic Feature:

  • This is ancient desert—Navajo Sandstone is part of one of the largest ancient sand dune systems on Earth.

🪶 4. Emerald Pools Trail (Lower Pool)

Formations:

  • Kayenta Formation dominates this area

  • Overlain by Navajo Sandstone

What to Look For:

  • Red, blocky rocks underfoot are Kayenta—siltstones and sandstones from rivers and floodplains.

  • The ledge you walk under is Navajo.

  • A small waterfall trickles down over this ledge—classic spring line at lithologic contact.

Geologic Feature:

  • The difference in erosion between soft Kayenta and hard Navajo creates natural alcoves and water seeps.

🏜️ 5. Checkerboard Mesa (East Side of Park)

Formations:

  • Pure Navajo Sandstone with unique jointing

What to Look For:

  • Horizontal layers = original dune deposition

  • Vertical cracks = jointing, possibly from unloading or thermal expansion

  • Combined, they form a “checkerboard” pattern.

Geologic Feature:

  • Thermal expansion and contraction crack the rock vertically over time—especially intense in high desert climates.

🦕 6. Moenave and Chinle Formations (Along Kolob Canyons Road or Dinosaur Track site near east side)

Location: Kolob Canyons Road or outside east entrance
Formations:

  • Chinle: Colorful slopes (purple, green, red) made of claystones and mudstones

  • Moenave: River-deposited sandstones

What to Look For:

  • Dinosaur tracks (outside the park, at the Zion Dinosaur Discovery Site at Johnson Farm near Hurricane) in Moenave sandstone

  • Bentonite clay layers in Chinle—watch out for slippery surfaces if wet

Geologic Feature:

  • These are Triassic and early Jurassic formations, deposited in fluvial and floodplain environments—very different from the Navajo desert.

🥾 7. Canyon Overlook Trail (East of Zion Tunnel)

Formations:

  • Navajo Sandstone—classic

  • Excellent cross-bedding and iron concretions

What to Look For:

  • Look for spherical iron nodules in the sandstone—these are concretions, formed when mineral-rich water precipitated iron in localized spots.

  • The color changes in sandstone (red to white) tell you about oxidation/reduction processes in ancient water tables.

Geologic Feature:

  • A chemically active desert, not just sand—groundwater played a big role here.

🏞️ 8. Observation Point (Top of the canyon, strenuous hike)

Formations:

  • Navajo on top

  • You pass through Echo Canyon, carved into Kayenta

What to Look For:

  • Vertical slot canyon in Echo Canyon is cut through soft Kayenta.

  • At the rim, observe a full stratigraphic section looking down into Zion.

Geologic Feature:

  • A rare view of downcutting in action—you’re standing above the very formations you walked through.

Guide to Zion Roadside Geology